November 2023 – Glass Etching & Candle Making
Acknowledgement of Country
For thousands of years the Kaurna people have walked on the land we meet today. We acknowledge them as the traditional owners and recognise them for their care and continued connection with this land. We acknowledge their Elders past, present and emerging and pay respect to Kaurna and other First Nations peoples present with us today. As a church community, we commit to actively work alongside First Nations people for truth, unity, equality, equity, and healing.
Timeline of the Night
6.30pm – Art Warm Up
6.35pm – Welcome and theme introduction
6.50pm – Intro to Art Activity
7.00pm – Creative Time
From 7.00pm – Dinner
8.00pm – Dessert
8.50pm – Farewell
8.55pm – Pack Up


Art Warm Up
The art warm up will help you loosen up and feel more confident to be creative later in the night.
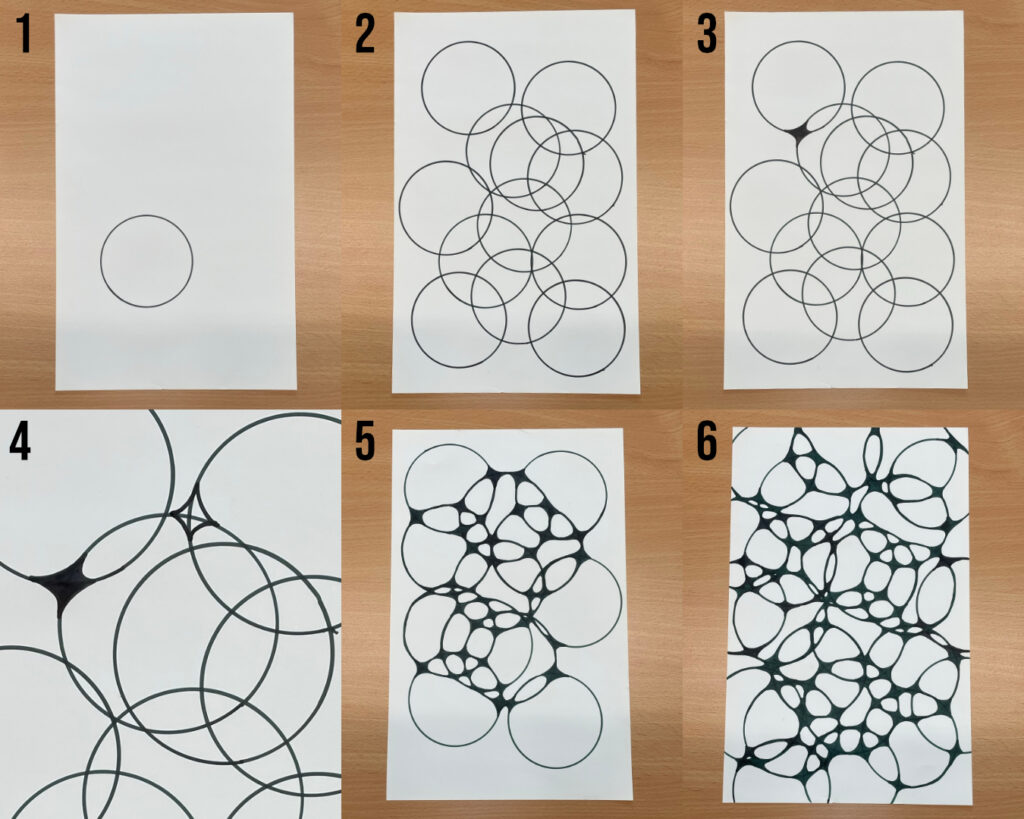
You will need: a piece of paper, a texta and a cup to trace around
Step 1: Use the cup to trace a circle on your page
Step 2: Trace circles all over the page, making sure the lines overlap
Step 3: Where the circles overlap round the lines
Step 4: See a close up version
Step 5: Do this at every point the circles overlap
Step 6: Add more circles if you like
Optional: Colour in the shapes

Theme for the night
Art Activity – Glass Etching & Candle Making
You can choose to participate in one or both of our activities tonight.
We have glass jars and drinking glasses that you decorate. You can choose two to decorate, but you will only be able able to make one candle.
For candle making only the glass jars can be used.
Glass Etching (or glass decorating)
There are several different techniques. Depending on what you wish to do with you glass afterwards will determine which technique you can use.
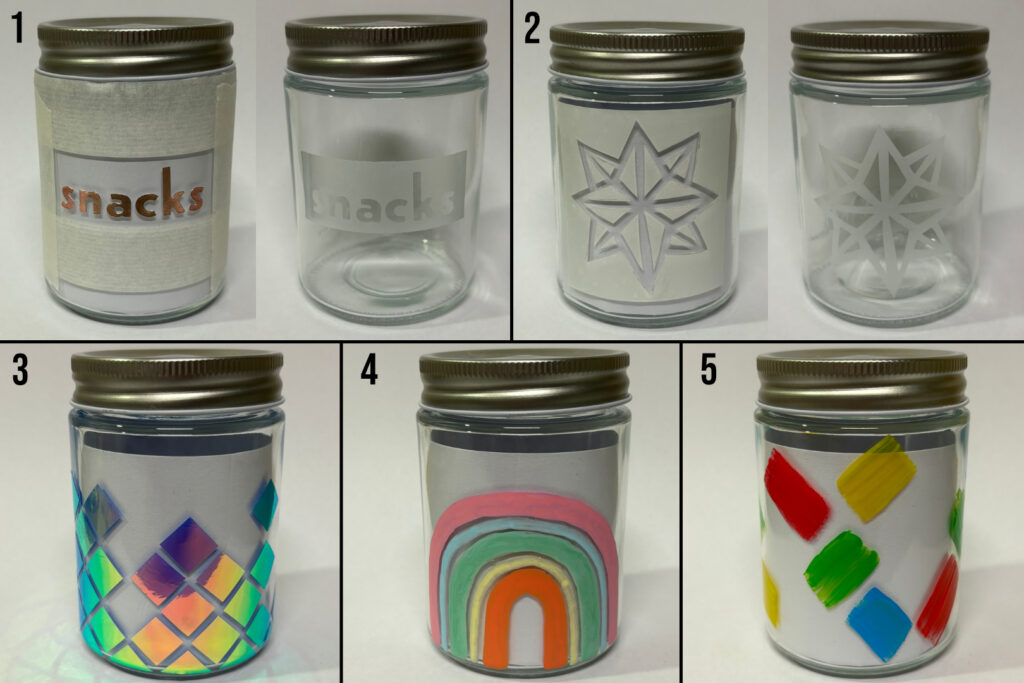
Option 1 : Glass Etching with Simple Stencils
Use stickers and tape to create a stencil on your glass or jar.
Once etched the glass will be food safe and dishwasher safe.
Option 2 : Glass Etching with a Stencil
Either use the precut stencils or use vinyl, scissor and a craft knife to create your own.
Once etched the glass will be food safe and dishwasher safe.
Extra Glass Etching Info:
1. The etching is created by using an acid paste. There are many safety considerations, therefore all actual etching will be done by Helen.
2. Make sure clean you glass with alcohol before putting a stencil on it, this makes its free of dirt or oils and will help your stencil stick better. (also make sure hands are clean)
3. Make sure you press down the edges of your stencils to make sure you get clean lines when etching.
4. When cutting vinyl, only press gently with the knife so you only cut the vinyl and not the baking to allow easier transfer to your glass.
5. You can use clear contact to help you transfer your stencils. CLICK HERE for a video explaining how.
Option 3 : Permanent Vinyl
Use vinyl scraps to cut shapes and stick to the glass.
The vinyl will become more permanent after 24hours curing.
After curing the glass will be food safe, but hand wash only.
Option 4: Paint Pens
Use paint pens to decorate the glass.
After drying the design will still be delicate and prone to scratching unless you seal it. The glass will NOT be food safe or be able to be washed.
Option 6: Ceramic Paints
Use a paint brush to decorate your glass. It is thick so it sticks to the glass and will be slightly transparent. You can also mix the colours.
Once dried for 24hr the paint can be made permanent by putting in the oven for 30mins at 140degrees. Once put in the oven the glass can be hand washed, but is not recommended for food and drink.

Candle Making
More instructions will be given verbally while you are making your candle.
You will need:
A clean and dry glass jar, warning label, sticky dots, wick, wick holder, soy wax, scents, jugs, spoons, measuring cup
Step 1 : Stick warning label on bottom on the jar, then stick in the wick and attach the wick holder.
Step 2 : When wax is up to temperature (approx 85 degrees), it can be poured into a mixing jug. Then add your scent (up to 10% of your total wax) and stir for 2 mins.
Step 3: When wax is approx 70degrees pour into your jar.
Step 4: It will take several hours for your candle to set, it is recommended that you don’t move it until fully set. Once set the wick can be trimmed.


