

October 2023 – Record and CD Painting
Acknowledgement of Country
For thousands of years the Kaurna people have walked on the land we meet today. We acknowledge them as the traditional owners and recognise them for their care and continued connection with this land. We acknowledge their Elders past, present and emerging and pay respect to Kaurna and other First Nations peoples present with us today. As a church community, we commit to actively work alongside First Nations people for truth, unity, equality, equity, and healing.
Timeline of the Night
6.30pm – Art Warm Up
6.35pm – Welcome and theme introduction
6.50pm – Intro to Art Activity
7.00pm – Creative Time
From 7.00pm – Dinner
8.00pm – Dessert
8.50pm – Farewell
8.55pm – Pack Up


Art Warm Up
The art warm up will help you loosen up and feel more confident to be creative later in the night.
Step 1: Get a piece of paper, a pencil/texta/pen and objects to trace around
Step 2: Place on object on your paper and trace around it
Step 3: Place other objects on your page and trace them. You can overlap them.
Step 4 and 5: Keep going until your page is full
Step 6: (optional) Colour in, or draw pattern in the different shapes on your page.

Theme for the night
Art Activity – Record and CD Painting
You can use either acrylic paints or paint pens to decorate Records or CDs.
There are pros and cons to either option.
Acrylic paints
Pros – easy to cover areas, can blend colours, can mix any colour you like
Cons – harder to control and to create smooth lines, can take longer to dry
Paint pens
Pros – easy to use and control, can create fine detail
Cons – can look a bit streaky, might need multiple layers, can bleed into the grooves of the record

Step 1: Prep your Record or CD. Spray with alchol and wipe with paper towel. This will clean off any dirt and oily residue.
Optional: If you are using a CD you can use tape to peel off the reflective coating to have a clear CD to paint.
Step 2: Choose a design and choose if you want to use acrylic paints, paint pens or a mixture of both.
You can add layers multiple layers of paint, just make sure the first layer is dry.
Step 3: Once paint is dry you can coat in clear varnish to stop the paint from chipping off.
Almost any acrylic paint technique can be use to decorate records and CD. See some examples above, and so ‘how to’ images below.
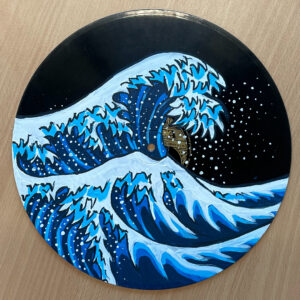
Based of ‘The Great Wave off Kanagawa’ by Hokuski
Step 1: Clean record
Step 2: Paint base layer of white
Step 3: Paint outline and details
Step 4: Add in colours
Step 5: Redo outline
Step 6: Add details

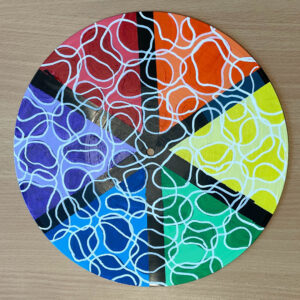
Step 1: Paint record label black
Step 2: Add tape to record
Step 3: Paint each section a different colour
Step 4: Add darker shapes
Step 5: Score paint around tape and peel off
Step 6: Add details with paint pens
